Note: the remote database features described in this section are for the "Fleet Network Edition" only. The other editions (Home, Professional, Fleet) do not have the remote database feature available.
Network Setup Overview
When you install the Vehicle Manager client software on your computer, an embedded database is installed by default to allow you to try out the software without further configuration. However, when you're ready to share the software on a network with multiple users, you need to install a shared database on a server. Any Windows computer may act as the database server, as long as it is accessible from all of the computers which need to access the shared database. You also want to make sure the computer is able to run without interruption to avoid any potential for database corruption which might occur if the computer is restarted while users are connecting to and using the database.
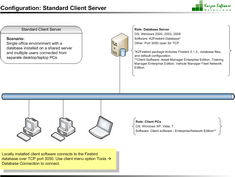
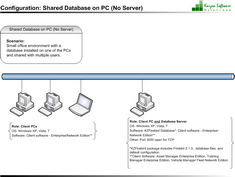
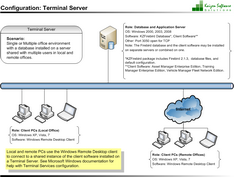
There are three basic configurations to choose from. Click on a diagram below to view full size:
 Single Office: Standard Client Server Configuration |
 Single Office: Shared Database on PC (No Server) Configuration |
 Multiple Offices: Terminal Server Configuration |
Configuration Instructions
Each of the configurations require three basic steps:
| 1. | Install the client software on the computers which will run Vehicle Manager. |
| 2. | Install the database server software on a shared Windows server. |
| 3. | Connect the client computers to the database server. |
You may watch a 3 minute instructional video, or follow the steps below:
Step 1: Install the client software
The client software is the program that users interact with to enter and update Vehicle records. If you have used the trial version of Vehicle Manager, then you have already installed at least one copy of this software. This software is available for download at:
http://www.kzsoftware.com/products/vehicle_maintenance/demo.htm
Note that in order to connect to a shared database server, you must install the "Vehicle Manager Fleet Network Edition". All editions of Vehicle Manager start in single user stand-alone mode by default. The "Vehicle Manager Fleet Network Edition" can also connect to a remote central database server.
Step 2: Install the database server software
The database server software is very easy to install in the default configuration. To install in the default configuration, follow these steps:
| 1. | Log on to your server and download the setup program from: http://www.kzsoftware.com/products/kzfirebird/download.htm. |
| 2. | Note that this is a different setup program than the one installed on the client computers. |
| 3. | Run the setup program, and accept all defaults. |
| 4. | This program will install a Firebird Database Server and a Vehicle Manager database. |
If you are using the Windows Firewall, configure it to allow Inbound TCP connections on Port 3050 as described below:
For Windows Server 2008, and later (2012, 2016, 2019):
| 1. | Open the Windows Firewall With Advanced Security: Start --> Search --> enter "firewall", and select the program "Windows Firewall With Advanced Security". |
| 2. | Select "Inbound Rules" in the left pane. |
| 3. | Click "New Rule" in the Actions pane on the right, and create a rule with the following settings: Rule Type: Port Protocol: TCP Specific Port: 3050 Action: Allow the connection. Profile: As required. Name: Firebird |
For Windows Server 2003 and 2000:
| 1. | Open the Windows Firewall dialog: Start --> Run --> enter "firewall.cpl", and then click the Ok button. |
| 2. | Go to the Exceptions tab, and then click the Add Port button. |
| 3. | Enter a name such as "Firebird Database", and then enter the port number 3050, and click Ok. |
Step 3: Connect the client computers to the shared database
After installing the database server, connect your client computer(s) to the shared database server by following these steps:
| 1. | Open Vehicle Manager on one of the client computers which it is installed on. |
| 2. | Select the menu option Tools --> Database Connection (Note: if you don't see this option, you need to install the "Vehicle Manager Fleet Network Edition" from: http://www.kzsoftware.com/products/vehicle_maintenance/demo.htm) |
| 3. | Enter the name of the database server in the connection dialog box (if you don't know the name of the server, log on to the server and right-click "My Computer", choose "Properties", and then select the "Computer Name" tab.) Note that you only need to enter the name of the database server - you do not need to enter a file path when connecting to a remote database server. The file path is only required when connecting to a local database file. |
| 4. | Click Ok |
| 5. | Close and then reopen Vehicle Manager. You're now connected to the shared database server. |
Note: If you cannot connect to the database server, please see the following section: Troubleshooting Connections.
When you're finished configuring the database connection, set up a scheduled task to backup the database daily.
Advanced - Database File Storage:
If you are a server administrator and would like to change the default location where the Vehicle Manager database is stored, you may do so by following the instructions below. Vehicle Manager is designed to run with the standard options "out of the box", and in most cases there is no reason to change the defaults; however, these instructions are provided for server administrators who would like to change the default installation.
| 1. | First stop the Firebird database service. |
| 2. | Next copy the database file from C:\KZSoftware\VehicleData.vdb to the new location where you would like it to be stored. Note: the new location must be located on a hard drive that is physically connected to the host machine. It cannot be located on a mapped drive, a file system share, or a network file system. |
| 3. | Next, open the file C:\Program Files\firebird\aliases.config in notepad and change this line: VehicleManager=C:\KZSoftware\VehicleData.vdb to reflect the new path to the database file. |
| 4. | Finally, restart the Firebird database service. |